July 2005 archives
July 3, 2005
Week 27: Hack, hack, hack
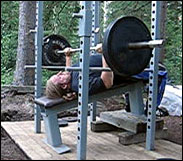
Monday, 27 June 2005: Bench
Quick and light as this workout might have been, it caused major soreness. Soreness = BIG no-no according to the Westside core litterature I’m wading through. Will elaborate on this later when I start organizing my reading notes. As a side note, this was the first time I ever did plate raises (front raises with a plate held by both hands). Delts, delts…
Plate raise: worked up to 2x10 @ 20 kg/44 lbs
Standing barbell curl: 3x10 @ 30 kg/66 lbs
Thursday, 30 June 2005: Squat/dead
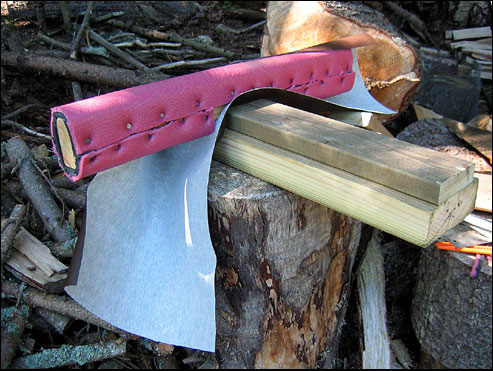
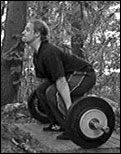 Still a rackless sucker, I had to come up with something else to do off the floor. Perhaps it was because it is one of Ano’s favorites, because Louie Simmons says it is great for deadlift starting strength, or because I told Scott way back that “I’d try them Wednesday“. Be that as it may, figured Hack Deadlifts (aka Hack Squats, aka Hack Squat Deadlifts, aka Behind the Back Deadlifts) would be both fun and instructive to try for the first time. Because the weight is further behind than on the conventional deadlift, I figured this might just be a helpful exercise for learning to lean less forward. This turned out to be partially true, but as the last couple of sets prove (VIDEO 3.1M), it is indeed possible to lean a bit on these as well… first time, first PR at 130 kg/287 lbs. Another keeper for sure.
5 @ 60 kg/133 lbs
5 @ 70 kg/155 lbs
5 @ 80 kg/177 lbs
5 @ 90 kg/199 lbs
5 @ 100 kg/221 lbs
2x1 @ 110 kg/243 lbs
1 @ 120 kg/265 lbs
1 @ 130 kg/287 lbs
2x0 @ 135 kg/298 lbs
Straight-legged sit-up on bench:
20 @ bodyweight
7,5 @ 5 kg/11 lbs
Arm and leg extension kneeling on stability ball: 12
Saturday, 2 July: Bench
Upped the weight on the behind-the-neck presses. 5x5 @ 50 kg/111 lbs started being tight, but I got it.
Close-grip bench with feet in the air: worked up to 3x5 @ 70 kg/155 lbs
Lying L-flye: 2x15 @ 6 kg/13 lbs
Bench shrug: 2x10 @ 70 kg/155 lbs
July 10, 2005
Week 28: Finished weight pit
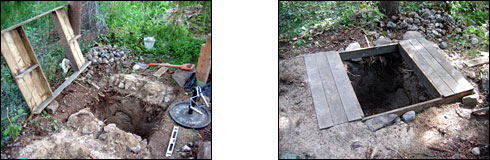
Finished the weight pit by building the top structure for it. In the process, I also decided I wanted it a tad deeper to allow for an extreme range of motion if needed. Unfortunately, Murphy’s law dictates that when digging in forrests large rocks will always materialize where they do most harm. After barely managing to deadlift the largest one out of there, I promptly added it to the growing collection of lifting stones I plan to have at Toffe’s Gym. The top structure is basically a lid made of treated wood (floor boards from my retired squat rack) resting on a lot of carefully placed stones to make it perfectly level in all directions. I did my share of jumping on it to verify that it is indeed rock solid, but might concrete it in a year or three if this turns into a permanent attraction. Whenever I build something for my gym, my motto is that it should be able to accomodate whatever unexpected strong company I might get.
The measurements for the finished pit are as follows: depth 60cm/23.4″, length 84 cm/32.8″, width 65 cm/25.4″. Besides the now staple handle squat, the measurements should accomodate a very wide range of exercises including bent over rows, curls, forearm rollers, stiff legged handle deadlifts… even shrugs. In fact, if you need an outdoor gym on the cheap, a pit combined with some plates, a loading pin and a couple of handles (V-bar, straight) will allow you to do most any exercise where you have the weight below you at the start. Still, your mother is liable to call it a grave.
Wednesday, 6 July 2005
After all that digging, I kept this short. Turned out to be the last workout for a week as I picked up my rack from the welder on Thursday. Before I knew it, I was preoccupied with hauling 1000kg/2210lbs of concrete by boat to Toffe’s Gym…
Bent-over handle row: 2x8 @ 60 kg/133 lbs
Stability ball crunch: 30
July 15, 2005
Rack sneak preview
Let me tell you that building a power rack in a forrest demands a surprising amount of work. When we left the summer cottage on July 14th for Rufus’s routine check-up in Helsinki, the rack was standing solidly in concrete and covered in a final layer of dark grey paint. I had hoped to get in at least one workout before departure, but as the concrete was to be covered for three full days to prevent premature moisture loss (especially needed in this heat!), I refrained. There was still a wooden floor to be made for the rack and the padding for my bench was also not quite ready. I will refrain from spilling the beans before everything is complete, but here’s a sneak preview of yours truly’s dad and yours truly in the midst of concrete frenzy.
July 18, 2005
Week 29: Quick detour indoors
We decided to stay in Helsinki for a few days before returning to the summer cottage for the last three weeks of my summer vacation. Took this opportunity to do a couple of sessions with Måns focusing on a bit of cable work and other stuff that I can’t do at Toffe’s Gym.
Friday, 15 July 2005
There is something that haunts us at the Töölö Gym. Like last time, we managed to arrive 30 minutes before closing time. This time there was a green poster on the door that exclaimed “the gym will close at 7pm on Fridays, ONLY on Fridays”. After a few obligatory sighs, we decided to just head back to World Class for a second visit since we like the laid back atmosphere. The music still sucked (how do you spell schlager?) , but got in a good workout. Worked up to a 4RM on the behind-the-neck press. Also found that a 25 kg/55 lbs is about all I can handle on the plate raises.
5 @ 40 kg/88 lbs
5 @ 50 kg/111 lbs
4 @ 55 kg/122 lbs
8 @ 45 kg/99 lbs
Close-grip bench:
5 @ 40 kg/88 lbs
5 @ 50 kg/111 lbs
5 @ 60 kg/133 lbs
5 @ 70 kg/155 lbs
5 @ 80 kg/177 lbs
Wide-grip pulldown, front: worked up to 3x8 @ 17 plates (unmarked)
Plate raise:
8 @ 10 kg/22 lbs
8 @ 15 kg/33 lbs
8 @ 20 kg/44 lbs
8 @ 25 kg/55 lbs
Standing barbell curl: 6,5 @ 40 kg/88 lbs
Total training time: 65 min
Sunday, 17 July 2005
 Third time’s the charm at Töölö Gym. I had forgotten my lifting shoes at the summer cottage, so figured I might just as well give the Hack deadlifts another go. 130 kg/287 lbs went up without too much effort, so gave 140 kg/309 lbs a shot. Came up, but didn’t make it to the summit. 135 kg/298 lbs was closer, but it was still too much after the 140 attempt. Overall a much more solid performance than two weeks ago, but no new shiny PR this time. Next found myself a lower pulley and worked up to a near max 15 reps with the 120 kg/265 lbs stack. Finished off with some of those standing cable crunches against a stability ball that seemed so popular over at Metal Gym (sans the bands though). The ball was a bit too foamy for my taste, it even said Foam something on it. QUICK! Here’s the video!!! CATCH!
10 @ 50 kg/111 lbs
5 @ 60 kg/133 lbs
5 @ 70 kg/155 lbs
5 @ 80 kg/177 lbs
3 @ 90 kg/199 lbs
2 @ 100 kg/221 lbs
1 @ 110 kg/243 lbs
1 @ 120 kg/265 lbs
1 @ 130 kg/287 lbs
0 @ 140 kg/309 lbs
0 @ 135 kg/298 lbs
Pull-through, bent-legged:
10 @ 40 kg/88 lbs
8 @ 60 kg/133 lbs
8 @ 80 kg/177 lbs
8 @ 100 kg/221 lbs
15 @ 120 kg/265 lbs
Standing cable crunch with stability ball: 3x8 @ 4 plates (40 kg/88 lbs?)
July 19, 2005
Rewarding visit to the back clinic
No, don’t worry. Didn’t kill my back again. Just figured that it was high time for a diagnostic visit to the back clinic to assess the condition of my back and to have my upper back adjusted. Was I ever happy I went!
The therapist, incidentally the head honcho of the establishment, had me do some of the standard bending and arm lifting before drawing my attention to the ever so slightly drooping right shoulder. Another protective response caused by the movement of the nerves being restrained. After a massage of the back, he proceeded to increase the mobility of the upper back. “The sound will resonate in your skull” he told me before twisting my neck, and was he ever right. Then he had me sit down with extended feet and told me to bend over. He leaned on top of me and pushed my head down in a few controlled jerky movements. Felt like torture, but after every few reps I could bend down further. He had me stand up and I could suddenly easily touch the floor with my arms. “What I just did stretched the neural tissue about 9 centimeters”. Wow.
This was followed by another neural mobilization exercise that felt like it would stretch my quads apart. “The interesting thing here is that the sensation has nothing to do with the muscle itself, but only the nerve.. the muscles themselves are nowhere near being stretched to an extreme”, he said in between jerks. He said that I can continue to train as normal, but should start to do 3 minutes of neural mobilization every day to ensure that I keep healthy. He further explained that this will be beneficial for my raw strength as well since restrained neural mobility will cause the brain to be quite conservative about how much force it allows the muscles to produce. When I asked whether I should come back ever so often for a check-up, he responded with an analogy: “you don’t drink cough medicine to prevent coughs, come back if you feel something’s up”. Three minutes of self-administered torture a day it is.
Today, one day after the visit, I feel swell and mobile. A good state to be in as we are now off to the summer cottage again. Will be backblogging my adventures in three weeks, since I rather enjoy the freedom from the lure of the computer. Power rack, here I come! ![]()
July 21, 2005
The making of an outdoor power rack and heavy-duty bench
In terms of physical length, this ought to be the longest entry so far and by far. Unfolding below is a full pictorial over how I designed and implemented a power rack and heavy-duty bench in my forest gym in Finland. The process turned into a long one and, as a result, some of this information can be found scattered over the archives. This is an attempt to pull that already told together with the final word in the hopes that it might be useful to someone somewhere sometime. Before we get on with it, let me just make it crystal clear that I am not an engineer. I did consult some people in the know about a few details, but generally speaking, this walkthru makes no pretence to be the right way. In fact, if you think I took a wrong turn somewhere your comment could save another home gym maker from following in my would-be footsteps. Let’s roll!

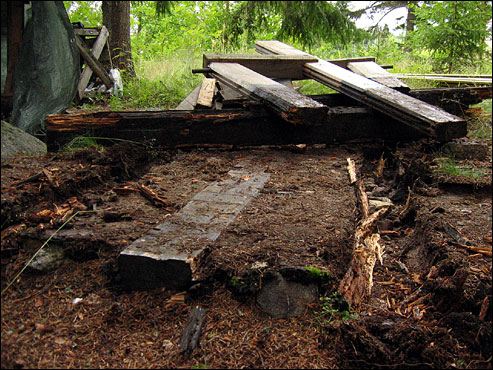
Built in 1996, my second wooden squat rack had served me well as a bodybuilder. Now, this focal point of Toffe’s Gym was about to be replaced by a powerlifter’s best friend, Mr. Rack, and his sidekick, Mr. Bench. For further reference, note the stone lying to the right of the rack.
You got to begin somewhere. In my case, figuring a welder can’t be too hard to find, I decided to first secure the iron. For a mere fourth of the retail price, I found everything I needed at the local junk yard. The iron was covered with a thin layer of surface rust, but my uncle, who knows about these things, assured me that it would be as good as new. After having thought over the design during a few weeks away from Toffe’s Gym (see the inspiration appendix), I returned to the junkyard with a grocery list in my pocket and our neighbor’s trailer behind my parents’s car. I knew the length of material I needed, but picked the actual dimensions on spot based on what was available. As I laid my eyes on some massive 100x150mm/3.9x5.9″ pipe, I got inspired to make a monstrous bench capable of supporting a tank or two. Another customer told me he was going to use the same thing as the main support beam of a large roof. The junk yard guy was kind enough to cut the material according to my specs. The edges basically consisted of melted iron as he used gas, but he made sure there was a reasonable safety margin on every piece.
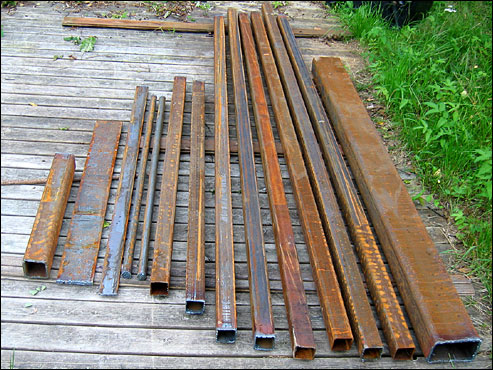
The loot. From right to left: 100x150mm/3.9x5.9″ pipe (10mm/0.4″ wall thickness) for the main frame of the bench, several pieces of 60x60mm/2.4x2.4″ pipe (3mm/0.1″ wall thickness) for the power rack frame, two pieces of 30mm/1.2″ iron rod for the safety pins, a 60 mm/2.4″ wide strip for the rack hook, a 120mm/4.7″ wide strip for the bench legs and a piece of 80x80mm/3.2x3.2″ pipe (5mm/0.2″ wall thickness) for the rack hooks. Total price 140 euros, or 174 US dollars according to the current weak dollar rate.
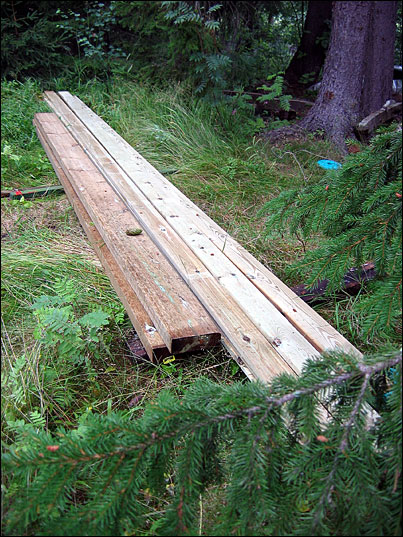
One of the big question marks was what kind of flooring the rack should have. After considering everything from concrete to a strip of asphalt road, I decided to sink the sides of the rack into concrete and build a wooden floor around it. This would entail renewing the flooring every few years, hence I got treated wood to get the most out of it. I returned from the lumber yard with 155x55mm/6.1x2.2″ support beams for 3 euro per meter/3.2 feet and 97x20mm/3.8x0.8″ floor boards at a discounted price of 0.8 euro per meter/3.2 feet. Paid 40 euro for all 50 meters/164 feet of wood, but later picked up some more beams to correct a slight miscalculation on my part.
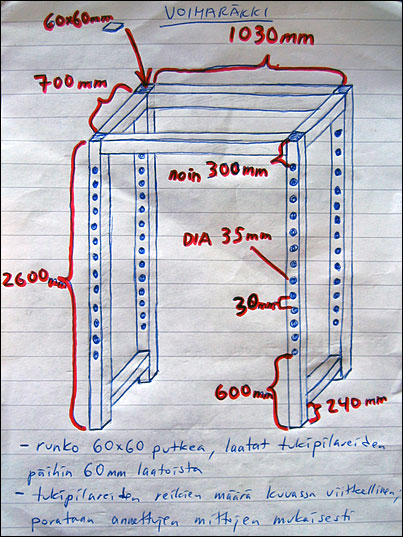
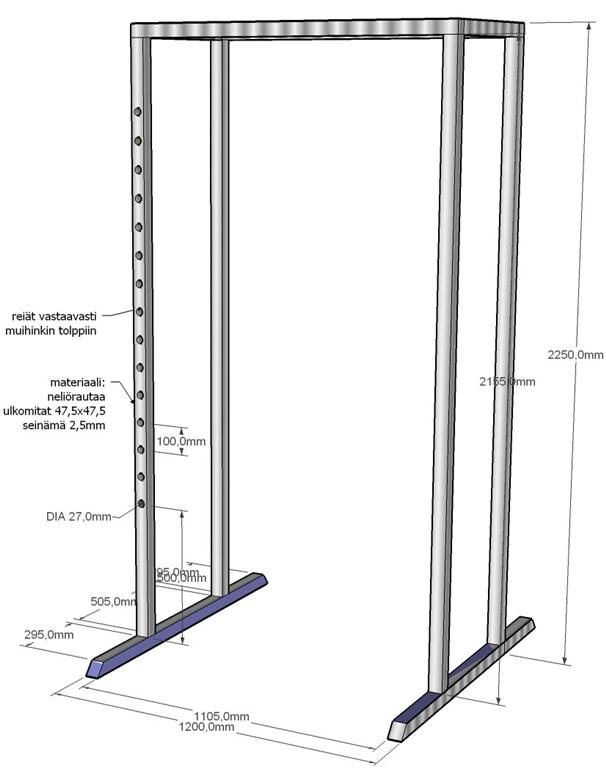
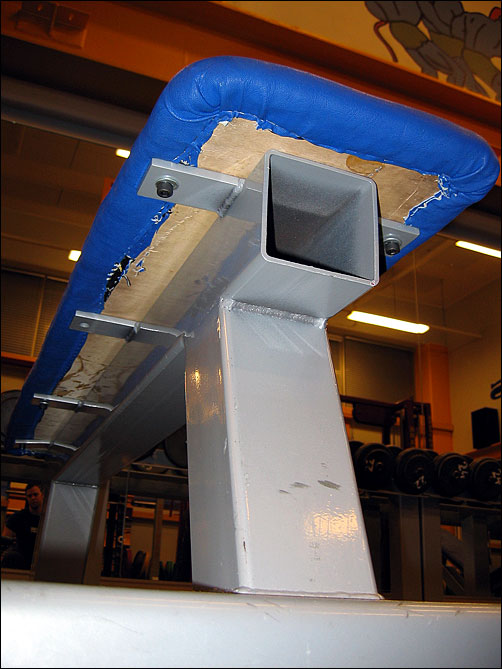
Now it was a simple matter to draw blueprints for the welder. I wanted the rack to be tall enough for standing overhead presses, deep enough to cater for more spacious movements like good mornings (but no more as to keep the rack as sturdy as possible) and completely open-base (I don’t like obnoxious racks who think they can tell me how wide I can go on squats and sumo deadlifts). In practice, this meant a height of 2.6m/8.53 feet (out of which 30cm/11.81″ would go underground) and a depth of 0.7m/27.6″ between the uprights. The number of holes in the drawing is not accurate, but a note was made that they should be drilled every 3cm/1.2″ beginning at 50cm from the bottom (note that the drawing says 60cm, but I changed this later) to about 30cm from the top. To keep rain out, the welder was asked to cover the open ends with pieces of the 60mm wide strips. Contrary to the blueprint, the final diameter of the support pin holes was 31mm/1.2″; a perfect fit for the 30mm/1.1″ pins.
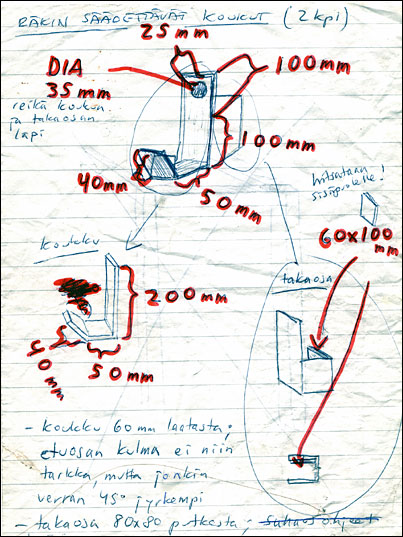
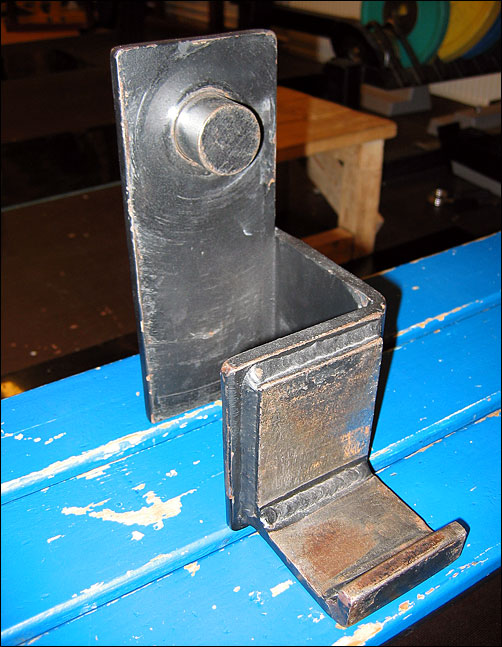
The blueprint of the rack hooks that left Einstein speechless… If you look past all the nitty-gritties, the concept is simple: one side of a 80x80mm/3.2x3.2″ pipe is sawed off with a piece of 60mm metal welded on the inside to make for a snug fit around the uprights, a hook of 60mm strip is welded to it and a final hole drilled through it to accommodate for the pin that locks it to the rack. Then make another one for it takes two to tango.
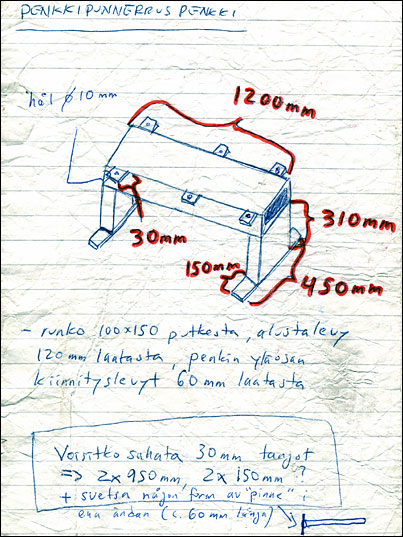
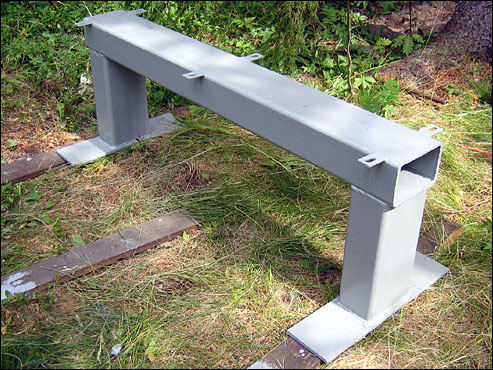
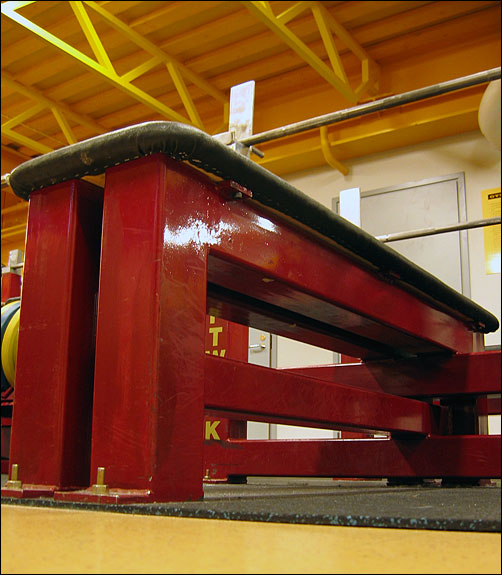
The bench was a straightforward affair: the main frame is made of 100x150mm/3.9x5.9″ pipe, the horizontal support from the 120mm/4.7″ wide strip and the extensions for bolting the padding to the bench of the 60mm wide strip. The length of the bench frame is 1.2m/47.3″ and the height 42cm/16.6″. At the bottom of the blueprint, the welder is also asked to saw the thick rods into two 95cm/37.4″ pieces (for the safety pins) and two 15cm/5.9″ pieces (for the rack hooks) with a 6cm long piece of some appropriate piece welded on each at one of the ends to keep the rods from sliding through.
Material and blueprints don’t make a rack any more than they make chili con carne. Perhaps it was a bit haphazard to purchase the material before getting a welder to agree to the job, but at least I didn’t risk becoming totally rackless by tearing down the old squat rack before I had my man. I first discussed the welding with my uncle and cousin, both of whom can weld well, but they agreed that this was a job best done by a professional armed with a MIG welder. As I was contemplating where I could find me a welder who would agree to drag both himself and his equipment out to the island, I learned that our new cottage neighbor had his own construction company. My dad had contracted him to replace the windows on the main house and, as it turned out, he readily agreed to have one of his welders come over to weld the rack and bench. Not much later the old squat rack went down.

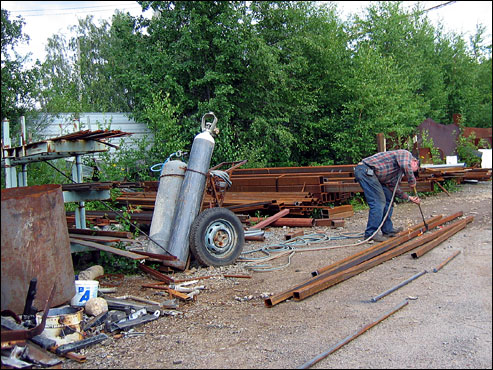
The vengeance of the Ice Age made sure I wasn’t bored while waiting for the welder to show up. A small rock next to the deceased squat rack was lying in the way of the rack floor and had to go. Did some digging around it, a task made tedious by the unfortunate amount of surface roots. Then dug some more. And some more. After a lot of work a huge boulder was finally uncovered. Talk about the tip of an iceberg! After briefly considering various options for chopping off the obnoxious tip of the rock (including dynamite as I have a demolition license), I decided to apply plain old brute force. I managed to budge it a bit with an iron bar and a lever, but it took a winch fastened to a nearby tree and the help of my dad to get it out of the hole. The benching chains came in handy here, but several ropes snapped as soon as we got the boulder going. Decided to leave it belly up close to the rack-to-be as a table and landmark.
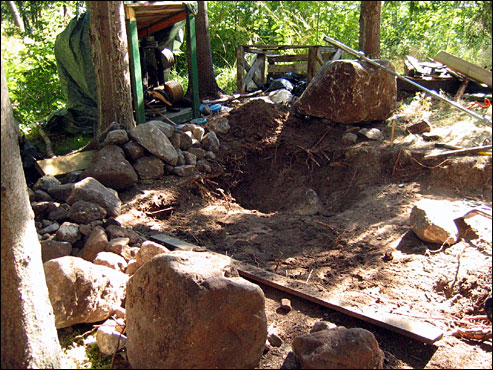
To say that I dug up lots of rock while preparing the ground for the rack is a crass understatement. This was also as far as I got during the summer of 2004. No welder showed up despite promises for late autumn and Toffe’s Gym was left to hibernate without a rack. As summer came around again the following year, I was determined to get this project moving again. The neighbor confirmed that he was unable to get a welder for me as the original one had been fired and he had found no replacement. The local yellow pages turned up no local hits for welders, but my friend Måns found me a number via Mr. Google. The welder was cautiously optimistic over the phone and asked about the working conditions out on the island. I drove over the next day with the blueprints. He didn’t have to give it more than a quick glance to conclude that it was not worth dragging a lot of heavy equipment out by boat. The thought of dragging all the iron back to the mainland was not fun, but a couple of days later I dumped it at his door step. We agreed that the cross beams of the rack would be bolted instead of welded to allow for easier transport back to the island. Words cannot describe how pleased I was.
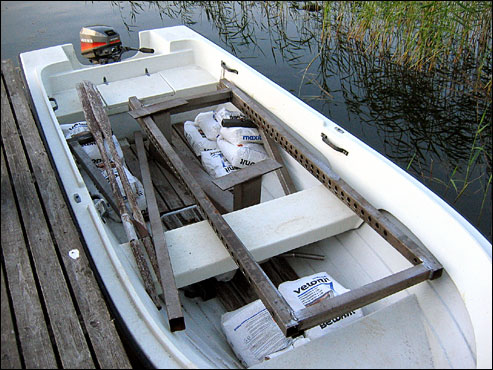
A few days before the promised deadline of two weeks, I called the welder to inquire about the status. Yes, the rack and bench had been finished late at night the day before. He also told me that the time needed for the project had been catastrophically underestimated from the original 3-4 hours. The large number of holes, 108 in the rack uprights alone, turned out to be the achilles heel. The large diameter had forced them to use three separate drills of increasing size. When it finally dawned on them how many holes they had to do work was already well underway. While he went off to do the math, I braced myself for financial disaster. He called me back and actually asked if I was sitting. Twenty hours of work at 43 euros/hour, or 860 euros/1044 US dollars! He proceeded to say that he realizes that this is a far shot from what we agreed on and that he would be willing to give me a 50% discount. I thanked him profusely for his kindness and then booked myself a trailer from the nearest gas station. By this time, I had changed my mind about the flooring. The base would be totally made of concrete and then covered with a layer of wood to keep it from chipping. Thus took a detour via K-Rauta, a large hardware store, to pick up twenty-five 25 kg bags of ready-mixed concrete, half of which got to accompany the rack and bench out to the island. The last thing I wanted was for my rack to go submarine due to having overloaded the boat.
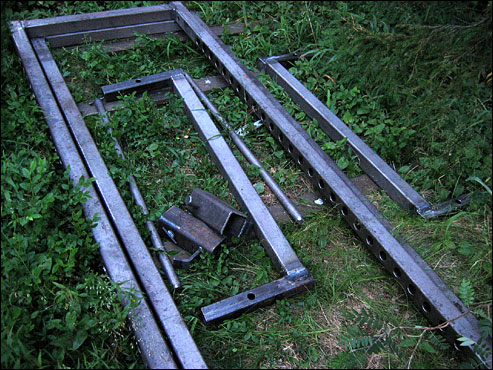
All the pieces of the rack immortalized at the end of a very long day. Note how the upper cross-beams have been joined to pieces of 50x50mm/2x2″ pipe that were to be inserted into the side frames and secured by bolting. It was a joy to see how shiny the formerly rusty iron had become thanks to sand blasting.

The next day I went shopping for paint. It was not easy to decide what color I wanted, but finally settled for grey over green. Bought 1 liter of metal primer (to protect against rust) and metal paint each. With no rain in sight, I started the time consuming work of applying metal primer to all parts. Before long, rack pieces were stacked up against rocks, my old Weider bench, even hung from trees, to dry. I also painted a piece of plywood I had bought for the bench with some old white wood primer I found in our shed (right). Note the stack of concrete in the background (left corner).
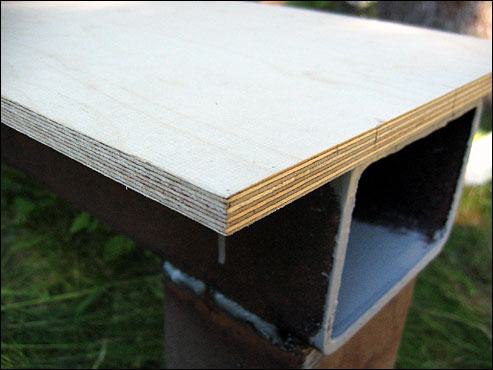
Close-up of the untreated plywood on top of the partially painted bench. The plywood is 12mm/0.5″ thick, nine layered birch. I had to cough up 50 euros for it, since they would not sell smaller pieces than 1220x2440mm/48x96″. On the bright side, I had them cut out several 1200x300mm/47.2x11.8″ pieces for use as spare parts. I could have gotten 12mm/0.5″ thick five-layered pine at half the price, but that didn’t appear sturdy enough. After all, the plywood needs not only to support whatever loads the lifter is using but must also be sturdy enough to allow the bench to be lifted from it. When the bench weighs at least 50kg/111 lbs, you don’t want pine.
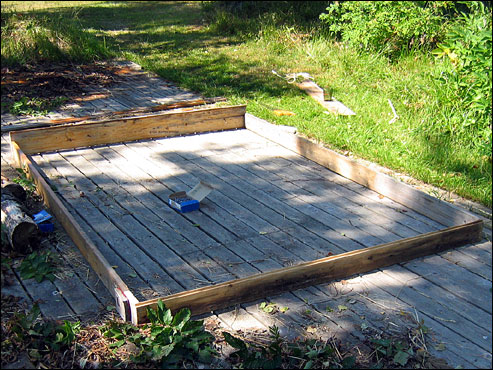
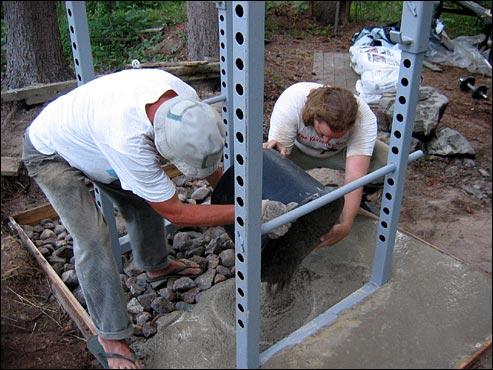
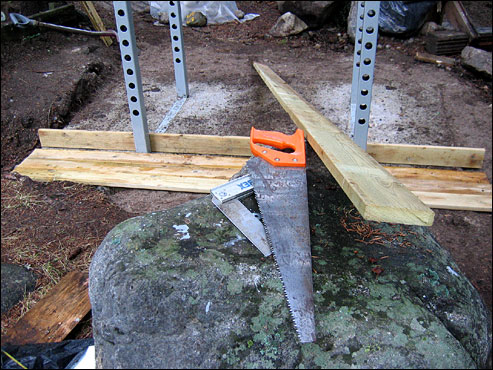
One of the most important things when concreting is to have a solid frame that delimits the area precisely. With a level frame around the rack, it is a simple matter to even out the concrete by pulling a board across the frame. The floor originally built for my younger brother’s table tennis needs was a good place to bang the frame together out of some scrap wood.

Getting both the concreting frame and the now assembled rack to be perfectly level in all directions took almost a whole day of minor adjusting. A spirit level is essential in this line of business. To save concrete, part of the massive amount of rocks and stones went in, but I made sure that they weren’t anywhere close to what would be the top of the floor to ensure a thick layer of concrete all over.

Nearly a week after the welded rack arrived by boat to Toffe’s Gym, it was finally time for the concrete. Once again, I was very thankful that dad had time to join in on the fun. Since we didn’t have a concrete mixer, we mixed all twenty-five bags by shovel. Well-mixed concrete, in this case 2.8 liters of water to every 25 kg/55 lbs of ready-mixed concrete, carries an uncanny resemblance to fresh dung… 625 kg/1381 lbs of concrete and about two hours later, we were only about half way there. The next day, I went back for 20 sacks more for 4 euros/4.9 dollars a pop. Without a trailer, I had to grab 10 sacks at a time in the trunk. I was pretty beat in the evening, but the show had to go on. Come nightfall the rack was fully surrounded by concrete.
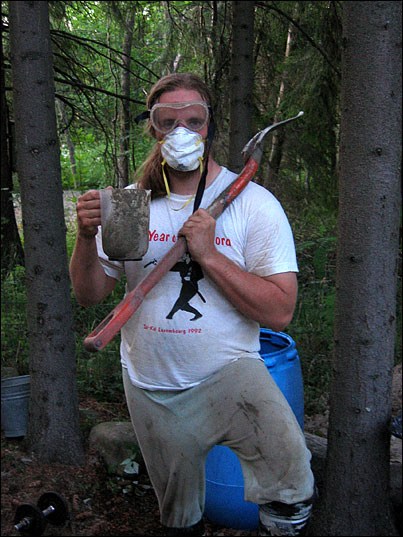
Special forces commando in full gear. You only need to look at the clothes to realize why it is important to protect the eyes and mouth when pouring dry concrete for mixing.
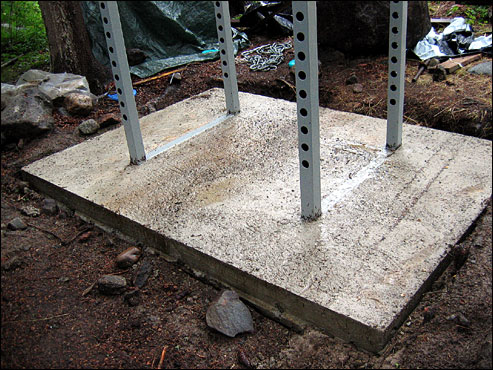
Concrete usually needs three days to settle during which time it should covered to prevent premature moisture loss. Luckily, this coincided with a short trip back to Helsinki. As soon as I returned to the scene of the concrete, I removed the plastic and concreting frame. Voilà!
After having applied the second layer of paint, a tad darker grey than the primer, I levelled the ground to fill all gaps between the concrete base and its surroundings and built a wooden floor on top of it all. I ended up attaching the boards to each other both by nailing them together and by placing cross-boards under each side. Nice n’ level.
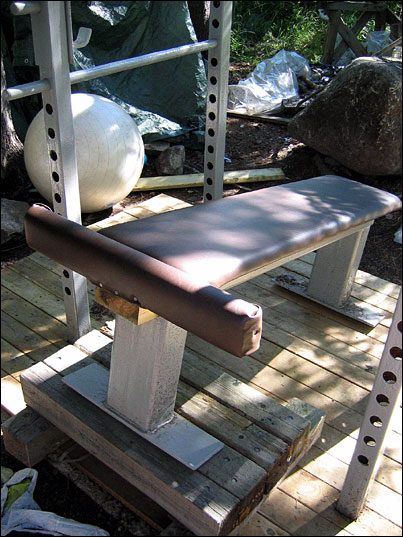
The only thing that now stood between me and a full-blown bench workout in my new rack was the half-finished bench. Here it is with the final layer of paint.
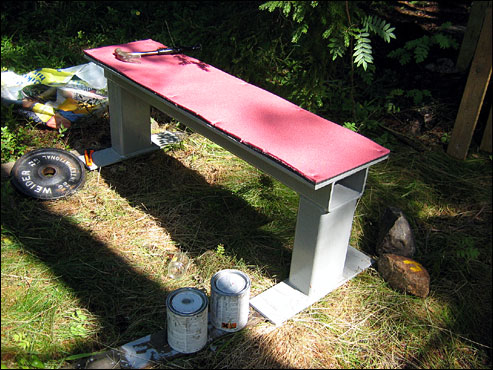
For the actual padding I bought two 12mm/0.5″ thick closed-cell foam camping mats, which I’ve heard that others have used with good success. After having painted the plywood with the same second layer paint as the bench itself and bolted it to the bench, the first layer of padding was secured with flat-headed nails. A layer of strong glue would probably not have been a bad idea either.
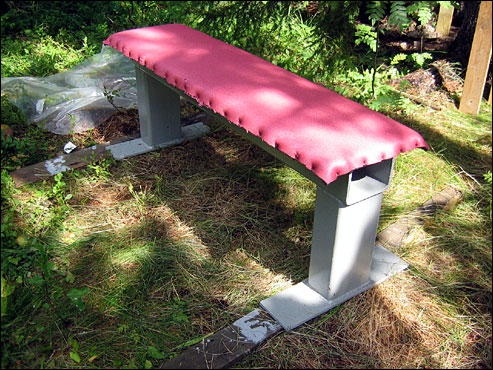
To give a bit of padding to the sides and to avoid nails directly under the lifter, the second layer was allowed to go over the sides. I’m not sure padding on the side is necessary, but it doesn’t seem to hurt either. 12mm/0.5″ of plywood on top of the 42cm/16.6″ high bench frame followed by 24mm/1″ of padding makes the final bench 45.6cm/17.9″ high, 32.4cm/12.8″ wide and 1.2m/47.3″ long.
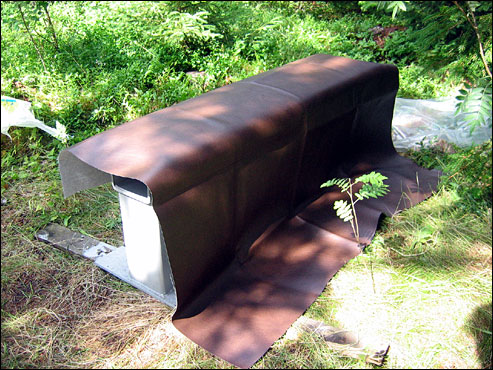
I opted to drape the bench in artificial leather, which is very commonly used on benches. The vendor told me that it is also used, among other things, on the seat of jet skis and should thus be somewhat rain resistant. That said, I’ll prefer to cover the bench. I paid 18 euro for a piece that was about double the amount I needed.
After having cut out a suitable piece, I fastened the leather to the underside of the bench with flat-headed nails. I also loosened the bolts temporarily so that I could get the leather in between the frame and the plywood at the ends of the bench. Done. Happy. Finally!
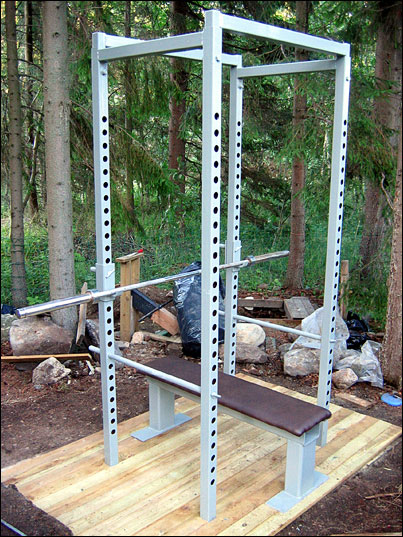
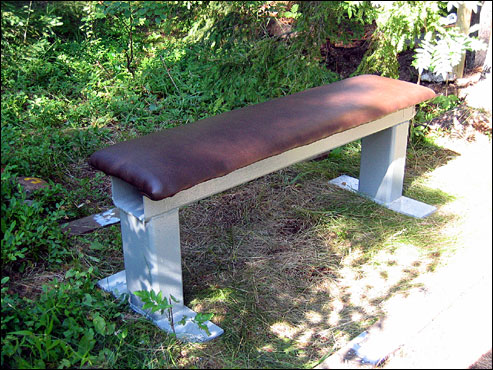
The pride of Toffe’s Gym (sans one board at the back of the floor that was added later).
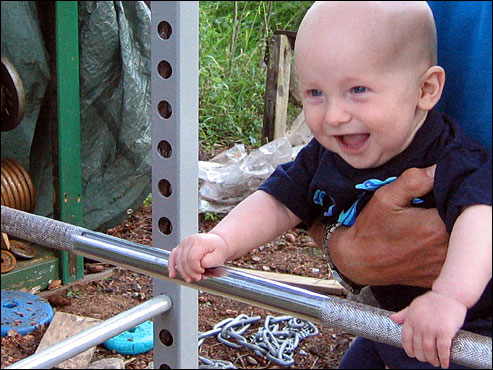
Rufus was as happy as his dad to see the project finished. Was it because he has already been bitten by the iron bug at the tender age of 5 months, or because dad would now have more time to play with him again…? The future will tell, but in the meantime I would like to thank my half-wife (aka fiancée) Sanna for supporting me throughout this project, my dad for helping me with many aspects of the project, my mom for feeding and encouraging me, the welder for being both proficient and a very good sport, and finally, all the people on the internet who have bothered to publish information on their own rack/bench projects. If this lengthy pictorial helps or inspires anyone, it shall be worth the hours it took to compile it. I love you all, good night and so on and so on.
Cost of project:
Below is the total hardware cost of the rack and bench. Note that there was some surplus material left, such as 8 bags of concrete and the beams I originally wanted for the wooden floor. On the other hand, nails, tools, wood primer, scrap wood and such were available at the summer cottage, so they are not included in the total cost. Also, Finland is not a particularly cheap country and you are liable to find that you can get it done cheaper in other parts of the world such as the United States. The moral of the story is that you should consult carefully with the welder, especially in regard to drilling costs. At least in this situation, the number of holes in the rack (27 in each upright) was the factor that determined price the most. Also, if you are going to build a rack for inside use you can deduct the concrete, the metal primer and the wood, which will put the price of the rack and bench at approximately 690 euros/838 US dollars given an identical price level. Much money can also be saved on the bench if it is built from smaller pipe. Compared with the rack/bench combo I was considering as an alternative to building my own, I saved about 300 euros plus shipping, but also got a much sturdier bench and an open base rack designed to be placed in concrete instead of bolted to the floor. Even if there wouldn’t have been a negligible price difference, the joy of having designed and implemented my own rack and bench from scratch would have made it worth it anyway.
Ready-mixed concrete,
45 bags or 1125 kg/2486 lbs179.55
Iron from junk yard
140.00
Nine-layered 12mm/0.5″ birch plywood,
1220x2440mm/48x96″50.00
Bolts, washers, nuts
11.00
Artificial leather
18.00
2 closed-cell foam camping mats
17.00 (30% off)
Welding
430 (50% off)
Primer and paint,
2 liters total45.00
Boards
40.00
=============================>
TOTAL: 930.55 euros/1,130.39 US dollars
Inspiration:
Adminin projekti: This thread over at Westsidebar details the journey towards a self-made fully equipped powerlifting gym that goes all the way to pulleys. Even if you don’t read Finnish, you should be able to locate the pictures fairly easily. Here’s one of the painted rack and bench and one of the unpainted plate loaded pulley. This thread was very influential in how I designed the bench.
Kuntolaite kotiin: A discussion over at the leading Finnish bodybuilding board Pakkotoisto with a good basic rack blueprint that served me well as a starting point from which to adjust the dimensions up. One reader welded his own according to the blueprint (but with 60x60mm pipe instead of the 47.5x47.5mm) and posted this picture.
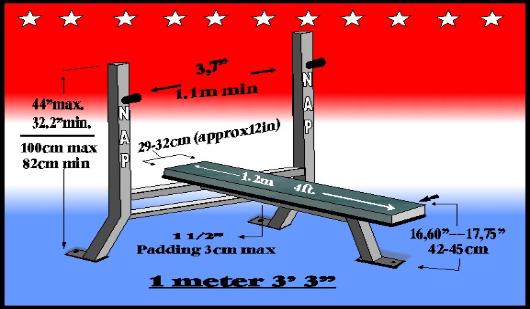
NAP Powerlifting rules: Decided to build my bench according to this federation’s legal specs, mainly because they provided such a good drawing of it. FWIW, besides certain manufacturer requirements, these measurements are also legal within the IPF (length not less than 1.22m, width 29-32cm, height 42-45cm).
Snapped a bunch of pictures of the custom-made Kraftwerk equipment at Mayor’s, the gym I trained at last year. This equipment, formerly part of Gold’s Gym Helsinki, is from the overkill sturdy end of the spectrum. Pictures: the most massive rack I’ve ever seen, close-up of the rack hooks, heavy duty bench press and regular movable bench.
How to Build Your Own Power Rack: I wouldn’t consider a non-welded rack, but this detailed page is well worth a look for any rack constructor.
New York Barbells’ Racks and Gyms: Before finally settling for a full rack, I took a close look at alternative smaller designs such as the power cage and the mini portable power rack.
July 23, 2005
Week 30: Anticlimax
Thursday, 21 July 2005: Structural balance test

While I was leading a computer-free existence at the summer cottage, a tidal wave known as Achieving Structural Balance by Charles Poliquin swept over the known powerlifting blog world (for example Stinn, Scott, Alberto, John M) in no time under the helm of Alberto “Prilepin” Caraballo. The article presents an unambigious testing protocol for determining whether a particular muscle weakness is holding back strength gains.
From all my reading of Russian weightlifting texts lately, I have come to appreciate the fact that all strength is neural in origin and that your voluntary 1RM lies well below the force the muscles are capable of. Neural feedback mechanisms, although quite conservative in most human beings, make sure that force production does not rise to levels where the muscles could injure themselves (as in muscles ripping themselves to pieces). Poliquin’s argument is that structural strength imbalances will similarly limit force production across the board as the body attempts to cover for its weakest link. He goes on to say that weak rotator cuffs often keep athletes from making further progress in the bench press. Based on normative data collected from several hundred athletes Poliquin has worked with, the protocol posits percentages of the close-grip 1RM that the athlete should be able to do in a number or exercise. This line of thinking is old hat in at least East Bloc countries where quite precise numbers have been developed for various proficiency levels of weightlifting (for example, see Roman 1988: The Training of the Weightlifter, pp. 101-104), but this is the first time I see it appear in a form readily applicable to a powerlifting exercise. Still, I bet some powerlifting coaches have similar numbers worked out.
Here’s Poliquin’s optimal strength ratios based on my current 100 kg/221 lbs close-grip bench press PR:
Absolute score: 100 kg/221 lbs
Relative score: 100%
Incline Barbell Press
Absolute score: 83 kg/183 lbs
Relative score: 83%
Supinated Chin-Ups
Absolute score: 81 kg/179 lbs
Relative score: 81%
Behind-the-Neck Presses
Absolute score: 64 kg/141 lbs
Relative score: 64%
Scott Barbell Curls
Absolute score: 46 kg/102 lbs
Relative score: 46%
Standing Reverse Curls
Absolute score: 30 kg/66 lbs
Relative score: 30%
External Rotation SA (for eight reps)
Absolute score: 9 kg/20 lbs
Relative score: 9%
I knew without testing that my incline press and standing reverse curls were right at the mark. After doing some too close close-grip benching that caused me to barely fail 100 kg/221 lbs and some lame pin presses that broke some mouldy PRs, I tested the supinated chin, outer rotation and scott curls (over a board rigged in the rack). Clocked in at 104 kg/230 lbs with all my gear and fatherhood fat, but still got 1½ strict chins (sigh, still remember how easy it was to chin when I weighed 80 kg/177 lbs). As a guy who has always done a reasonable amount of cuff work, the external rotations passed… barely. The scott curls weren’t even close. The recent 4 @ 55 kg/122 lbs on the behind-the-neck press should just about be enough for the required 65 kg/144 lbs press; definitively not something I could have achieved just a few weeks earlier.
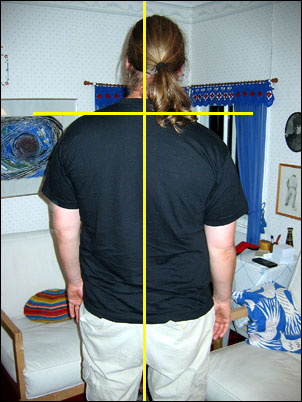
In a sudden twist worthy of a nightmare, I never got around to the post-workout shake. Instead I plunged back into dark times as my lower back again decided to go spastic (picture with added lines for emphasis - still quite a moderate case). The cramp largely subside after I did the neural mobilisation exercises, but the reappearance of the dreaded drooping shoulder was enough to put a big dent in my mood. After feeling sorry for myself for an undisclosed amount of time, during which I even considered giving up powerlifting altogether, I took the venerable bull by its horns and vowed to get back into rehab even if it would set my squat and deadlift ambitions back another year. Shit happens it seems, but I couldn’t help wondering whether the recent visit to the back clinic had been a capital mistake. Had the adjustment upset some precious balance causing the body to rebel?
8 @ 40 kg/88 lbs
5 @ 50 kg/111 lbs
3 @ 60 kg/133 lbs
3 @ 70 kg/155 lbs
1 @ 80 kg/177 lbs
1 @ 90 kg/199 lbs
0 @ 100 kg/221 lbs
Pin press, low range lockout:
5 @ 60 kg/133 lbs
3 @ 80 kg/177 lbs
3 @ 100 kg/221 lbs
2 @ 120 kg/265 lbs
1 @ 122.5 kg/271 lbs
0 @ 130 kg/287 lbs
0 @ 125 kg/276 lbs
Supinated pull-up: 1½ @ bodyweight (104 kg/230 lbs with all gear on)
Outer rotation (seated dumbell L-flye):
8 @ 6 kg/13 lbs
8 @ 10 kg/22 lbs
Seated scott curl (over padded inclined board in power rack):
3 @ 30 kg/66 lbs
1 @ 40 kg/88 lbs
0 @ 45 kg/99 lbs
0 @ 42.5 kg/94 lbs
Saturday, 23 July 2005: Rehab
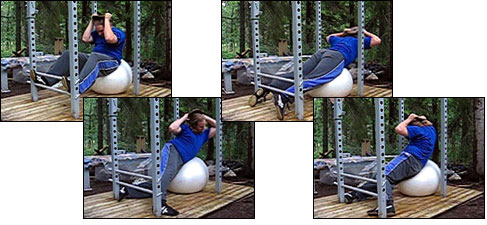
For obvious reasons, I dedicated this workout to pure rehab. The back was feeling a bit better and I had regained some optimism about the future. Nice and easy, nice and easy for now. The core of the workout was a swiss ball ab circuit (crunch, side bend, hyperextension) with feet supported against the two safety pins set low in the rack. As cliché as it might sound, this combo is a winner. See it sung on the weekly video summary (8 MB) to the tune of Children of Bodom’s cover of the Maiden classic Aces High.
Walkouts with alternate arm and leg lift: 10, 8
Swiss ball ab circuit (non-stop): 1x5, 2x10 @ 5 kg/11 lbs plate
crunch
left side bend
hyperextension
right side bend
July 29, 2005
Making a decline bench attachment
I don’t know why, but declines is the exercise I have most associated with the renovated Toffe’s gym. The bench is easy enough to decline by raising one end, which is also how the Westside guys do their declines on the pre-2004 Bench Press workout tapes, but trying to do declines without leg support is like having Humpty Dumpty ski backwards down the Rockies. Since the bench main frame is open at both ends, making a removable support was as easy as some wood coupled with left-over padding and artificial leather. Maxing out next.
July 30, 2005
Week 31: Heels over head
Monday, 25 July 2005
The assault on the behind-the-neck press continued. Last time I maxed out at 4 @ 55 kg/122 lbs, today a tight but clean 5x5 with only 2.5 kg/6 lbs less on the bar. Continued with the now standard feet in the air pressing, this time with a reverse grip, and bench shrugs. No big complaint was filed from the back department.
Reverse-grip bench, feet in the air:
8 @ 50 kg/111 lbs
8 @ 60 kg/133 lbs
6 @ 70 kg/155 lbs
Bench shrug:
10 @ 60 kg/133 lbs
10 @ 70 kg/155 lbs
10 @ 80 kg/177 lbs
Tuesday, 26 July 2005
After some preliminary core exercises, I stuck the pins in just below knee level. I had some doubts, but the therapist had, after all, assured me that I can continue training as normal. Rack pulls! Once I got up to 100 kg/221 lbs, the stiffness told me I wouldn’t be able to go much heavier. Decided to do one last set with 110 kg/243 lbs, but after only one rep I knew I had to call it a day. I was as crooked as… well, you know the drill. Did some ab circuits to get some blood flowing and then pulled myself straight again with some decompression and neural mobilisation exercises. Whatta life. ;-/
Walk outs with arm and leg lift: 10
Arm and leg extension kneeling on stability ball: 10
Rack pulls, below knee (4th pin):
10 @ 60 kg/133 lbs
10 @ 70 kg/155 lbs
10 @ 80 kg/177 lbs
5 @ 90 kg/199 lbs
5 @ 100 kg/221 lbs
1 @ 110 kg/243 lbs
Swiss ball ab circuit (non-stop): 1x5, 2x10 @ 5 kg/11 lbs plate
crunch: 15 @ bw, 10 @ 15 kg/33 lbs
left side bend: 15 @ bw, 10 @ 5 kg/11 lbs
hyperextension: 15 @ bw, 10 @ 15 kg/33 lbs
right side bend: 15 @ bw, 10 @ 5 kg/11 lbs
Friday, 29 July 2005
 Woke up this morning and decided it was time for a decline bench press PR now that I had a good setup. I made 105 kg/232 lbs my goal, a good 5 kg/11 lbs increase over my previous max. To make for suitable weight jumps and easy plate switching, I loaded two 2.5 kg/5.5 lbs plates innermost and then only concerned myself with making the usual 10 kg/22 lbs jumps. Got it, and it was easy too. Anything after that, including a looney 105 kg/232 lbs attempt with chains, crashed faster than you can say bye.
Wrapped up with some plate raises with two 15 kg/33 lbs plates sandwiched together. In retrospect, I was happy I didn’t drop one of them on my head… think twice before doing this with iron plates. Lying rows, then glow of PR satisfaction. The glow rubbed off on the video (2.5MB) in a flash gordon kind of way, epileptics beware.
5 @ 45 kg/99 lbs
5 @ 55 kg/122 lbs
1 @ 65 kg/144 lbs
1 @ 75 kg/166 lbs
1 @ 85 kg/188 lbs
1 @ 95 kg/210 lbs
1 @ 105 kg/232 lbs (PR!)
0 @ 107.5 kg/238 lbs
0 @ 105 kg/232 lbs + chains
Plate raise:
4 @ 30 kg/66 lbs
6 @ 25 kg/55 lbs
Lying row:
3x8 @ 70 kg/155 lbs